Caradise Project Car Part Deux: The Trim Piece that Took Five Days to Install

Sometimes, on one’s own project car, what would appear to be the “easy parts”, end up being the most difficult ones. We found this out the hard way last week.
Our project car, A 1995 Mitsubishi 3000GT VR4 Spyder, aka “Project Gwen” had lived a rough life, but we are determined to bring this car back to its former glory.
As some of you know, the folding hard roof on this car meant the return of the hard-roof convertibles to the American Market, that hadn’t been seen since 1959, when the Ford Fairlane 500 Skyliner stopped production. The folding hard roof mechanism was done by ASC in the US and was basically a hand-made car for every Mitsubishi 3000GT Spyder versions, which weren’t many.
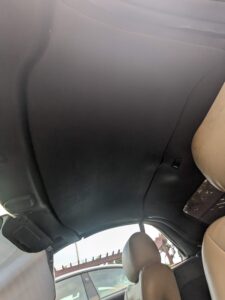
The roof itself comes with several pieces of hard-plastic headliner, not cloth. The main ‘headliner’ piece is a 43 inch by 25 inch single piece that attaches to the inside of the roof of the car. That piece required four U-nuts, 5 screws that would hold the piece to the moving roof. This piece cannot be loose or simply the car would refuse to fold its roof neatly into the trunk. The trunk sensors would go off if the piece was loose or misaligned.
The previous owner had a simpler solution, just don’t use the piece at all. Which meant that when I got the car, and I got inside, when I looked up, all I saw was the bare metal, holes, screws, clips and a ton of glue stuck to the inside of the roof. At least the previous owner kept all the trim pieces, because to get that piece alone, someone on ebay was asking $2,800 for it. Did I mention Spyder VR4 parts are nearly non-existent and very, very expensive?
When looking at the plastic headliner piece, I realized the holes where the screws would hold the piece were all broken on the corners. Furthermore, only one u-nut remained in place and one screw. I was gonna have to look everywhere in hardware stores to get something similar.
The first step was to remove all the glue from the roof. I wasn’t sure if I would require glue as well to re-attached, but just in case, I had to scrape the glue off the inside of the roof. That took a whole Sunday being inside of a very hot car, using a scraping plastic tool and a ton of goo-gone. I had to get glasses as the flakes were dropping everywhere.
Second, I went looking around several places to find the proper flat U-nuts, after three visits to different hardware places, I found what I needed at a NAPA store. Not quite the same size, but very close. In order to repair the holes, I used washers that I glued with loctite glue, and had to secure with bind paper clips for a whole day. It was a lot of trial and error and had to make sure the washer was aligned with the U-nuts. I use small screwdrivers to align everything.
On day two, I attempted to secure the trim, but i had placed the U-nuts grabbing the edges of the trim piece, and that didn’t work out. I finally figured out that the U-Nuts had to be glued on one side of the edges, the washer on the other side of the trim, and that would the only way to secure them to the metal pieces where they would screw on.
So on day three, I had to remove it the piece again (easy because it was barely holding) and re-glue the pieces needed in the correct order and left the glue to set overnight secured by clips. That was the end of that day.
The next day, all pieces were glued, then I prayed to all the saints, the old gods and the new gods, as I’ve opened the roof and had to stop mid-way, so that I could secure the headliner piece, and have access to the front and back of the roof to screw the 5 screws (3 front, two back) and also added some double sided tape on some edges, hoping that would help. It took like 2 hours until I finally nailed the steps to secure the headliner piece to the roof. One of the U-nuts fell off, but I was still able to screw the plastic headliner in place.
However, after setting the screws, I noticed the piece itself was slightly deformed, probably from years of storage laying on one side, so I also had to find a stick long enough to pressure the part into shape and left overnight with a stick pushing the part upwards, the wood stick would rest on the center console and pressured the headliner piece where it needed to be.
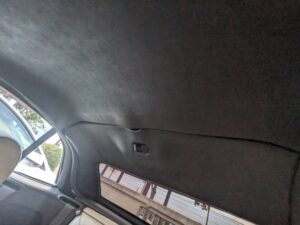
Finally, after 5 days, the roof piece held together well, I was able to close and open the roof without any issues and claim victory on this one. Still other trim pieces are pending, but this one really took days just to get it done. There are no easy parts on this car. Plus, I lost all my six pictures that I took of the process, so here is the final result. Victory!